
Growing up, I was an avid fan of anything that was Japanese. As I mentioned in my other post, I was 10 when I came across with Yuyu Hakusho televised at what was then IBC-13. I was constantly amazed with their literature and media, from reading mangas to watching Japanese animes and live-action movies, singing my heart to their original sound tracks; it was unbelievable how the Japanese way of doing things affected my preferences and a lot more. One more thing I love about Japan is its people — yes, very disciplined, respectful and sensitive to others.
For our annual anniversary trip, Troy and I have decided to visit four Japan cities: Tokyo, Kyoto, Osaka and a day-trip to Nara. It was mid-October, so I was hoping that we could see the autumn foliage. Unfortunately, the leaves just started turning their color and I just learned that the autumn peak for these cities were mid-to-late November. I was kinda disappointed, but hey! That means more trips to Japan right?
So here’s our amazing trip to Japan! Read on for some tips and travel guides.


ABOUT JAPAN

Japan is an island nation that can be found in Asia. The country is surrounded by the Sea of Japan in the east and the Pacific Ocean in the west. It also sits along the Pacific Ring of Fire, so the country has a lot of active volcanoes and experiences frequent earthquakes. Mt. Fuji, famous for it’s snow-capped mountain top, is one of Japan’s most iconic tourist attraction. In case you don’t know, the Japanese name for Japan is “Nihon” or “Nippon” which directly translates to “sun’s origin”, thus the country getting its moniker “The Land of the Rising Sun“.
This country enjoys abundance in natural resources. Since it was never colonized, Japan was able to preserve many of its customs and traditions, transporting you back into an era where samurais rule the land, when wearing kimonos was fashion, and studying folk arts or music was imperative. I love how it blends history and culture — tradition amidst all the technological advancements, industrialization and globalization.
Japan boasts a lot of places to visit, things to do, activities to experience, and information to learn. Ten days to do everything was kulang! You can be sure you’ll never run out of ideas on how to spend your vacation here.
VISA REQUIREMENTS

Being a Philippine passport-holder, getting a Visa was something that we needed to work on. For more details on how to apply for Japan Visa, refer to our related article here: How to Apply for a Japan Visa?
GOING TO JAPAN: TRAVEL OPTIONS
There are many airlines flying from Manila to Narita or Haneda. Budget carriers such as Cebu Pacific and Jetstar offer flights to Narita Airport multiple times a day in a week. For our trip, I was able to book Cebu Pacific’s piso-fare back in December 2017, so I just paid roughly a thousand bucks for 2 persons one way from Manila to Narita. Like me, if you’re a fan of piso fares, you can definitely book cheap tickets!
Remember to purchase a baggage allowance if you’re planning to buy a lot of pasalubongs. We bought a total of 40kg since I’m planning to buy a lot of Kitkats, Royce and Meiji chocolates, hahaha!
WHEN TO GO?
When to go really depends on your target season. Spring and autumn are the most popular out of the 4 seasons.
- Winter – December to February
- Spring – March to May
- Summer – June to August
- Fall – September to November
Personally, I would like to visit Japan during spring and autumn. The climate is moderate, the foliage is great!
WEATHER
Fortunately for a girl living all her 30+ years in a tropical country, the temperature varied from 12 degrees to 19 degrees Celsius. Tokyo was colder, compared to Kyoto and Osaka. I personally prefer this kind of weather, since I really struggled a lot during our winter trip to Seoul last February 2018.
CLOTHING
Troy and I packed light jackets, prepared a few heattech garments, and a light-down jacket. I was able to wear clothes I normally wear in Manila such as blouses and dresses, and just covered myself with a coat or jacket. It kept me warm so I guess when we go back (planning on spending next spring here), we would be bringing same set of clothes.
WHERE TO STAY?
Where you stay is very critical when planning your itinerary. I normally book our accommodation first, before working on the itinerary since the starting point would be our hotel.
TOKYO
Situated in Shinjuku, Tokyo Plaza Hotel is the perfect place to experience Tokyo and its surroundings. From here, guests can enjoy easy access to all that the lively city has to offer. The hotel has excellent service and superior facilities make for an unforgettable stay. For the comfort and convenience of guests, the hotel offers free Wi-Fi in all rooms, daily housekeeping, taxi service, 24-hour front desk, luggage storage.
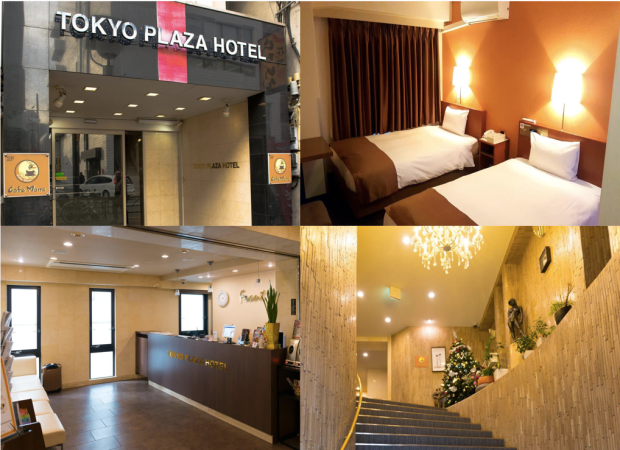 [Photo and Hotel Description grabbed from Agoda website]
Address: 2-15-1 Hyakunin-cho, Shinjuku, Tokyo, Japan
Nearby Attractions: Tokyo Metropolitan Government Building, Shinjuku Gyoen National Park, Meiji Shrine, Shin Okubo Korean Town, Shibuya
Our itinerary required a lot of traveling by train, so the location of this hotel is excellent since it’s very accessible to the JR Yamanote line. It’s in Shin Okubo so there were a lot of stores and restaurants nearby. There’s also Donki branch beside it. Rooms are generally clean. My wish for this hotel though is to make the breakfast earlier than 7:30. Overall, it was a really nice stay.
KYOTO
Offering quality accommodations in the culture, sightseeing, shopping district of Kyoto, Hotel Gracery Kyoto Sanjo is a popular pick for both business and leisure travelers. With its location just 0 km from the city center and 55.3 km from the airport, this 4-star hotel attracts numerous travelers each year. With its convenient location, the hotel offers easy access to the city’s must-see destinations.
 [Photo and Hotel Description grabbed from Agoda website]
Address: 420, Sakuranocho, Rokkakudori, Teramachi-higashiru, Kawaramachi, Kyoto, Japan
Nearby Attractions: Nijo Castle, Kyoto Imperial Palace, Kiyomizu Temple, Shinkyogoku Street, Teramachi, Nishiki Market
We picked this hotel since it’s so close to Nishiki, Teramachi, Shinkyogoku Markets. It’s also a walking distance to bus stops. Hotel room is great, beds are super comfy! Breakfast has a wide selection too. Staff are kind and approachable. We loved our stay in this hotel!
OSAKA
Designed for both business and leisure travel, karaksa hotel Osaka Namba is ideally situated in Namba, one of the city’s most popular locales. Only 50 KM away, this 3-star property can be easily accessed from the airport. With its convenient location, the property offers easy access to the city’s must-see destinations.
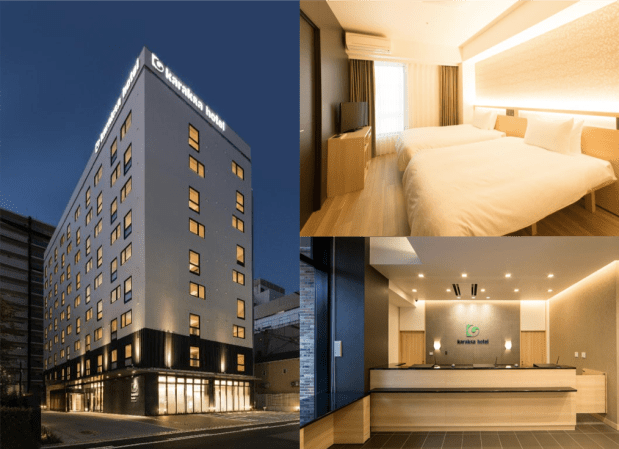 [Photo and Hotel Description grabbed from Agoda website]
Address: 2-9-13 Nishishinsaibashi, Chuo-ku, Shinsaibashi, Osaka, Japan
Nearest Station: Namba
Nearby Attractions: Dotonbori, Shinsaibashi-suji Shopping Street, Namba
This hotel is so close to Dotonbori and very accessible to food hubs, shopping districts and train stations. Rooms are spacious, staff are kind and approachable. Hotel is clean and organized. There’s a laundry room if you want to wash your clothes. i just hope they put more selection on the breakfast. Overall, it was a nice stay.
TRANSPORTATION OPTIONS AND GETTING AROUND
Japan is one of the countries with the best but probably most complex transportation system in the world. The trains are well-maintained and always on-time, the commuters don’t pile up even during rush hours. People are very disciplined, they know how to queue.
Another option is to take the bus. Japan has a very organized bus system. Fees vary depending on your destination and distance traveled. You can use your Instant Cards when paying for your bus ride.
Taxis are also available but we weren’t able to ride a taxi since the subways and trains are already very reliable and convenient. Some drivers don’t speak English so be ready with your translate apps to aid you when giving directions.
Over-all, I would recommend taking the trains and buses. It would take time for you to familiarize, but once you get the hang out of it, you’ll be an expert in no time.
AIRPORT TRANSFERS
There are several ways to get from Narita Airport to downtown Tokyo: via the limousine bus, the Narita Express, the Tokyo Keisei Skyliner and private charters.
- Narita Airport to Tokyo: via Keisei Skyliner


I bought our airport transfer tickets via Keisei Skyliner from Klook. You need to exchange the Klook voucher to a Skyliner exchange ticket at their redemption counter (beside JR East Office). Then, you’ll change the exchange ticket to an actual ticket at the entrance gates of the train. The entire trip lasted for 40-50 minutes. The cabin is open and spacious; we were able to safely store our luggage at the dedicated luggage space. The seating is reserved, so you’ll be comfortable the whole ride.
- Osaka Namba to Kansai Airport: via Nankai Rapi:T Limited Express


I also bought our airport transfer tickets for Namba to Kansai Airport from Klook. Similar to our experience with Keisei Tokyo Skyliner, you need to exchange the Klook voucher to an exchange ticket at their redemption counter in Nankai Namba Station. Then, you’ll change the exchange ticket to an actual ticket at the entrance gates of the train. The entire trip lasted for 40 minutes. The seating is also reserved and the entire ride was smooth.
JR PASS


Riding the Shikansen has always been on my travel bucket list. The Japan Rail Pass is the most economical means of travelling throughout Japan by rail. However, you need to carefully plan the places you want to go, since you might not be able to maximize your 7-Day JR Pass if you’re just travelling in short-distances between cities. This pass is exclusive for foreign tourists and cannot be purchased when you’re already in Japan. Again, you have to purchase this while you’re in your country.
- Travel agencies and online websites such as Klook, KKday and Flytpack offers different types of JR Passes (7-Days, 14-Days, 21-Days). Remember to carefully check your itinerary to determine the best type of JR Pass you’ll need.
- Once purchased, you will receive a Voucher which you will need to exchange to the actual pass. In my case, the Voucher was mailed to my office.
- At the JR Office in Narita Airport, exchange the Voucher to the JR Pass. It’s only a paper where your name and passport details are written at the back. The ticket officer will ask you the activation date since it will start the validity period of your pass.
- In case you want to reserve seats for your out-of-Tokyo trips, you can also ask the ticket officer to assist you. We have reserved our seats for our Tokyo-Kyoto Shinkansen ride via the JR counter in the airport.
You can use the JR Pass not only in JR trains, but also in buses which are operated by JR. When riding the train, just go through the manned gate, and show the pass to the staff. Remember: No need to go through the automatic gates. This is the same case when riding the buses. You just need to show your rail pass to the bus driver.
You have to be really check the trains and buses operated by JR. Other lines will not allow you to use your pass, so you’ll need to pay your ride.
We’re thankful that we were able to save a lot on transportation while using this pass.
IC CARD (SUICA)

There are several IC Cards (Reloadable Prepaid Cards) that are sold throughout Japan. You can use these cards to pay fares in public transport such as buses, trains and subways. You can also purchase drinks and food from vending machines.
Since our port of entry was Tokyo, the available IC Cards sold are: Suica and Pasmo. Suica is the prepaid IC sold by JR East, while PASMO is the prepaid IC card of railways/buses other than JR.
We bought Suica for no other reason than there’s a penguin in the design, hahaha! Nevertheless, you can use any IC Card anywhere in Japan. You can load the card at loading counters inside the train stations. The card is valid up to 10 years, so Suica — we’re gonna use you again when we return in Japan. 🙂
FOREIGN EXCHANGE
As of March 16, 2019:
- 1 Philippine Peso (PHP) = 2.11 Japanese Yen (JPY)
- 1 US Dollar (USD) = 111.43 Japanese Yen (JPY)
I suggest exchanging your PHP to Japanese Yen prior your travel dates. In BDO, you need to reserve 3-5 days before you’re able to buy foreign bills. I do not recommend exchanging money in airports since the rates are lower. In addition, call your banks and/or credit card companies for a travel advisory so you won’t encounter any issues when using your ATMs and credit cards abroad. Making a travel advisory also prevents fraudulent transactions since the bank will be monitoring your account activities.
You can find plenty of money changers in Shinjuku, Shibuya, Kyoto and Osaka. Bring your passport or any ID, since they verify first before exchanging your money.
CONNECTIVITY

Japan has fast internet speeds. Though most of the public places offer wi-fi connection, we decided to rent our own wi-fi router. There are several options for you to stay connected during your stay there.
Klook offers wi-fi device rental for as low as PHP 300/day. Please take note that a security deposit is usually collected by the merchant which will be refunded once you return the device.
Book your 4G Wi-Fi Device via Klook here: Unlimited 4G WiFi (JP Airport Pick Up) for Japan
Since we’re happy with our previous provider, we rented again from Flytpack. Booking through Flytpack was easy. Just go to their website and select your travel dates, the number of router you’re renting and your target destination. Payment is usually via Paypal or credit card. Please take note that you also need to pay for a deposit which will be refunded (within 14 days) once you return the device. The router was delivered to me 3 days before our travel dates, and I scheduled a pick-up day after our arrival.
Book your 4G Wi-Fi Device via Flytpack here: https://flytpack.com/wifi

Our Itinerary
<Placeholder>
|
DAY 1 |
TOKYO DAY 1: Arrival + Hotel Check-in + Western Tokyo Tour
|
| DAY 2 | TOKYO DAY 2: Northern Tokyo Tour
|
| DAY 3 | TOKYO DAY 3: Mt. Fuji Tour
|
| DAY 4 | TOKYO DAY 4: Central Tokyo Tour + Southern Tokyo Tour
|
| DAY 5 | KYOTO DAY 1
|
| DAY 6 | KYOTO DAY 2
|
| DAY 7
|
KYOTO DAY 3 / OSAKA DAY 1
|
| DAY 8 | OSAKA DAY 2
|
| DAY 9 | OSAKA DAY 3
|
| DAY 10 | OSAKA DAY 4
|
| DAY 11 |
HOME-BOUND: MANILA
|
Our Budget
You can definitely save more if you plan DIY instead of relying on travel agencies. It’s more exciting but needs a lot of work! So if you have longer time preparing, I suggest you plan out your trip super ahead of time. I started our itinerary around August and worked on it for 2 months. Research is very important, especially on the accuracy of directions. But hey! It’s exhilarating to get lost once in a while. 🙂
You can definitely cross some items in our list below, or water down the expenses. It just so happened that our flight from Osaka to Manila was expensive (no piso fare anymore); and that we booked hotels instead of BNBs or hostels.
DISCLAIMER: Actual expenses included in this guide account for 2 persons.
| SUMMARY OF (ACTUAL) EXPENSES | ||
| ACTIVITY | COST (KRW) | COST (PHP) |
| Prepaid Expenses | ||
| Airfare (Cebu Pacific and Jetstar) |
JPY 94,944.00 | PHP 47,472.00 |
| Hotel Accommodation (Tokyo, Kyoto, Osaka) | JPY 156,910.76 | PHP 78,455.38 |
| Flytpack Wifi Router | JPY 8,020.80 | PHP 4,010.40 |
| Visa | JPY 4,800.00 | PHP 2,400.00 |
| JR Pass 7-Days | JPY 51,708.14 | PHP 25,854.07 |
| Klook Tours and Activities | JPY 68,440.54 | PHP 34,220.27 |
| On-Site Expenses | ||
| Meals | JPY 66,395.00 | PHP 33,197.50 |
| Transportation | JPY 27,284.34 | PHP 13,642.17 |
| Other Tour, Activities and Souvenirs | JPY 16,800.00 | PHP 8,400.00 |
Things to Do in Japan: Tours and Activities
- Catch our Tokyo Experience here: SOON!
- Catch our Kyoto Experience here: SOON!
- Catch our Osaka Experience here: SOON!
- Catch our Nara Experience here: SOON!
I hope you got something from this post. Let me know how your trip goes! Enjoy! 🙂
